
Good news, everyone! I’ve come up with a good way for Colin’s Raspberry Pi to talk to his Arduino. To review, the idea was that the Arduino could handle low-level control functions like speed control, odometry, and sensor reading. This leaves the Raspberry Pi free to handle high-level control like obstacle avoidance, motion planning, and state estimation.
There are a few steps in this process:
Freeing Up the Raspberry Pi’s Serial Port
The first problem we have to deal with is that the Raspbian reserves its serial port for use by a serial console. So the Raspberry Pi’s GPIO serial port is totally useless until you free it up. I’m not going into all the details here, but I found this guide really helpful. The important things to remember are that you need to enable uart in config.txt and disable the serial console. This will allow our program to use the serial port.
Top of page
The Communication Protocol
The communication protocol works like this:
- The Raspberry Pi sends 2 16-bit ints to the Arduino
- The first int is the commanded translational velocity
- The second int is the commanded angular velocity
- The Arduino sets its speeds accordingly and then updates its sonar sensors
- After the sensors are updated, the Arduino sends 11 16-bit ints back to the Raspberry Pi
- The first 8 ints are the distance readings from the 8 sonar sensors
- The last 3 ints are the Colin’s x and y position and his heading, calculated from odometry
Using this protocol, Colin will run at the commanded speeds until he receives another command. This causes a problem: Colin will continue to run even if the serial communication fails and the Raspberry Pi stops sending commands all together. This means he could run off a cliff and there would be nothing to stop him!
To fix this I have the Raspberry Pi send commands at a regular interval. If, for example, Colin expects to get a new command every quarter second and he doesn’t get a command at the expected time, he will know there’s a communication problem. If Colin detects a communication fault he can respond in a fail-safe manner by stopping.
Communication Formatting
How do we send ints over serial though? Arduino’s Serial.print() function converts int and float values to strings of chars before sending them. At first this might seem really convenient, but it actually causes more problems than it solves. First, Arduino and C++ don’t have a great function for converting char strings to int or float values. Second, C++ doesn’t automatically convert numerical types to strings before sending them via serial, so you’d need to write your own function for that. Lastly, if we convert numbers to strings, their lengths will be variable. This means we would need to define some way to tell when one value ends and the next begins.
The good news is none of that is necessary! You know why? Every command and sensor packet will be exactly the same length: 2 16-bit ints for commands and 11 16-bit ints for responses. Further, the ints will always come in the same order. So the meaning of each byte is predictable.
The only problem is you can only send individual bytes over serial. But this is easily solved by splitting the ints into their component bytes before sending:
char firstByte = (byte)(value & 0xFF);
char secondByte = (byte)((value >> 8) & 0xFF);
and reassembling them on the other end:
int value = (secondByte << 8) | firstByte;
Top of page
Wiring It Up
Wiring up the Raspberry Pi to the Arduino is pretty simple, but there’s an important catch. The Raspberry Pi uses 3.3 volt logic and the Arduino uses 5 volt logic. So we need to use a level shifter to allow communication between the two devices. If the level shifter gets a 3.3 volt signal on the low side, it sends out a 5 volt signal on the high side. If it gets a 5 volt signal on the high side it sends out a 3.3 volt signal on the low side. Pretty simple, right? Wire it up as shown below:

Wiring for serial between a Raspberry Pi and an Arduino
Top of page
The Code!
Okay, enough talk. Let’s get into the code. I’m going present the code for the Raspberry Pi side first, and follow it up with the Arduino code. The complete code for the Raspberry Pi can be found here and the Arduino code can be found here.
Raspberry Pi Code
Opening the Serial connection
First, we need to open a serial connection with the Arduino. This is handled by the following function, which I adapted from this extremely helpful site. Check out that site if you want details on how all of this works.
void SerialBot::openSerial()
{
	serialFd_ = open("/dev/serial0", O_RDWR);
																						// to allow blocking read
	if (serialFd_ == -1)
	{
		cerr << "Error - unable to open uart" << endl;
		exit(-1);
	}

	struct termios options;
	tcgetattr(serialFd_, &options);
	options.c_cflag = B9600 | CS8 | CLOCAL | CREAD;
	options.c_iflag = IGNPAR;
	options.c_oflag = 0;
	options.c_lflag = 0;
	tcflush(serialFd_, TCIFLUSH);
	tcsetattr(serialFd_, TCSANOW, &options);
}
There is one important difference between my function above and the one it’s adapted from: I dropped the O_NOCTTY and O_NDELAY flags from the open command in line 3. This means my serial connection will be blocking. In other words, when I call the read() function the program execution stops until there is data to read in the serial buffer. In other words, my program will wait for a response from the Arduino before continuing.
Sending Commands
Sending a command works as follows:
int SerialBot::transmit(char* commandPacket)
{
	int result = -1;
	if (serialFd_ != -1)
	{
		result = write(serialFd_, commandPacket, commandPacketSize);
	}
	return result;
}
And, in case you’re wondering, the function that assembles the commandPacket is below.
void SerialBot::makeCommandPacket(char* commandPacket)
{
	int16_t intAngular = (int)(angular_ * 1000.0);
	commandPacket[0] = (char)(translational_ & 0xFF);
	commandPacket[1] = (char)((translational_ >> 8) & 0xFF);
	commandPacket[2] = (char)(intAngular & 0xFF);
	commandPacket[3] = (char)((intAngular >> 8) & 0xFF);
}
Note that angular_ is a double representing Colin’s commanded angular velocity. The size and representation of doubles is inconsistent, however, so it’s difficult to break them up and reassemble them on a different machine. Int representations are very consistent, however, so I just multiply angular_ by 1000 to save the first three decimal places and cast it to an int. The loss of accuracy is pretty negligible for our purposes.
Receiving Data
The function below is how we receive data from the Arduino. Note that I’ve set the read to time out after 0.25 seconds. The Raspberry Pi expects to get a response from the Arduino after every command is sent. If it doesn’t receive a response before it’s time to send the next command, it throws an error.
int SerialBot::receive(char* sensorPacket)
{
	memset(sensorPacket, '\0', sensorPacketSize_);
	int rxBytes;
	if (serialFd_ != -1)
	{
		// set up blocking read with timeout at .25 seconds
		fd_set set;
		FD_ZERO(&set); // clear the file descriptor set
		FD_SET(serialFd_, &set); // add serial file descriptor to the set
		struct timeval timeout;
		timeout.tv_sec = 0;
		timeout.tv_usec = 250000;

		// wait for serial to become available
		int selectResult = select(serialFd_ + 1, &set, NULL, NULL, &timeout);
		if (selectResult < 0)
		{
			cerr << "blocking read failed" << endl;
			return -1;
		}
		else if (selectResult == 0)
		{
			cerr << "read failed: timeout occurred" << endl;
			return 0;
		}
		else
		{
			rxBytes = read(serialFd_, sensorPacket, numSonar_ + numPoseVariables);
		}
	}
	return rxBytes;
}
Once we’ve read data from the Arduino, we need to parse it:
int SerialBot::parseSensorPacket(char* sensorPacket)
{
	int16_t firstByte;
	int16_t secondByte;
	int16_t inValues[numSonar_ + numPoseVariables];
	for (int i = 0; i < numSonar_ + numPoseVariables; i++)
	{
		firstByte = sensorPacket[2 * i];
		secondByte = sensorPacket[(2 * i) + 1];
		inValues[i] = (secondByte << 8) | firstByte;
	}

	for (int i = 0; i < numSonar_; i++)
	{
		distances_[i] = inValues[i];
	}

	x_ = inValues[8];
	y_ = inValues[9];
	theta_ = ((double)inValues[10]) / 1000.0;
}
Note again that Colin’s heading, theta_ , is a double. To save some bother in programming, the double value is multiplied by 1000 and casted to an int before it’s sent. So it needs to be casted to a double and divided by 1000 after it’s received.
Putting It All Together
Okay, last thing: we’ll put all of these things together in a communication function that runs every 0.25 seconds in its own thread:
void SerialBot::commThreadFunction()
{
	while (true)
	{
		char commandPacket[commandPacketSize];
		makeCommandPacket(commandPacket);
		if (transmit(commandPacket) < 1)
			cerr << "command packet transmission failed" << endl;
		char sensorPacket[sensorPacketSize_];
		memset(sensorPacket, '\0', sensorPacketSize_);
		int receiveResult = receive(sensorPacket);
		if (receiveResult < 1)
		{
			cerr << "sensor packet not received" << endl;
		}
		else if (receiveResult < commandPacketSize)
		{
			cerr << "incomplete sensor packet received" << endl;
		}
		else
		{
			parseSensorPacket(sensorPacket);
		}
		usleep(readPeriod_);
	}
}
Top of page
The Arduino Code
Are you still with me? That took a while, but we got one side of it done. So we just have the Arduino code left to deal with.
Receiving
Let’s start with receiving a command from the Raspberry Pi:
void readCommandPacket()
{
  byte buffer[4];
  int result = Serial.readBytes((char*)buffer, 4);

  if (result == 4) // if the correct number of bytes has been received
  {
    int commands[2];

    // assemble 16 bit ints from the received bytes in the buffer
    for (int i = 0; i < 2; i++)
    {
      int firstByte = buffer[2 * i];
      int secondByte = buffer[(2 * i) + 1];
      commands[i] = (secondByte << 8) | firstByte;
    }
    translational = commands[0];
    angular = (double)commands[1] / 1000.0; // convert received int to double angular velocity
    colin.drive(translational, angular); // set Colin's speeds
    commandReceived = true; // note that a command has been received
    lastCommandTime = millis();
  }
  else if (result > 0)
  {
    Serial.println("incomplete command");
  }
  // else do nothing and try again later
}
Note that I’m using the Serial.readBytes() function rather than the more common Serial.read() function. There’s a couple of reasons for this. First, Serial.read() only reads a char at a time, but we know we need 4 bytes. Serial.readBytes() also blocks the program’s execution until it receives the requested number of bytes. This is perfect, since it means we’ll get a complete packet, instead of just receiving part of one.
Transmitting
The transmit function first puts all the data that needs to be sent into an array, buffer. Then the buffer is sent to the Raspberry Pi using Serial.write() . Note that I’m not using Serial.print() because it automatically converts int values to characters, and we want to send the bytes exactly as-is.
void sendSensorPacket()
{
  colin.getPosition(x, y, theta); // updates Colin's position
  byte buffer[22];
  addDistances(buffer); // adds sonar readings to buffer
  int sendX = (int)x;
  int sendY = (int)y;
  int sendTheta = (int)(theta * 1000.0);
  buffer[16] = (byte)(sendX & 0xFF);
  buffer[17] = (byte)((sendX >> 8) & 0xFF);
  buffer[18] = (byte)(sendY & 0xFF);
  buffer[19] = (byte)((sendY >> 8) & 0xFF);
  buffer[20] = (byte)(sendTheta & 0xFF);
  buffer[21] = (byte)((sendTheta >> 8) & 0xFF);
  Serial.write(buffer, 22);
}

void addDistances(byte* buffer)
{
  for (int i = 0; i < NUM_SONAR; i++)
  {
    buffer[2 * i] = (byte)(sonarDistances[i] & 0xFF);
    buffer[(2 * i) + 1] = (byte)((sonarDistances[i] >> 8) & 0xFF);
  }
}
Bringing It All Together
The loop() function below brings everything together. It checks to see if there is data in the serial buffer and, if so, attempts to interpret it as a command. If it successfully reads a command, it requests an update from the sonar controller. After the Arduino gets updated sensor readings it assembles a response packet and sends it back to the Raspberry Pi.
Lastly, the Arduino checks to see if more than 1 second has passed since the last command was received. If so, it assumes that a communication fault has occurred and it stops Colin.
void loop()
{
  // check if a command packet is available to read
  readCommandPacket();

  // request a sensor update if a command has been received
  if (commandReceived)
  {
    commandReceived = false;
    requestSonarUpdate(SONAR_ADDRESS);
  }
  // send sensor packet if sonar has finished updating
  if (distancesRead)
  {
    distancesRead = false;
    sendSensorPacket();
  }
  currentTime = millis();

  // stop colin if a command packet has not been received for 1 second
  if (currentTime - lastCommandTime > 1000)
  {
    Serial.println("command not received for 1 second");
    lastCommandTime = millis();
    colin.drive(0, 0.0);
  }
}
Top of page
Where Do We Go From Here?
Now we have a good way to communicate between Colin’s Raspberry Pi and Arduino. Colin doesn’t have a way to perceive the world around him, however, so that’s our next step. I designed an independent controller to read Colin’s sonar sensors and relay the information to the Arduino via I2C. My next post will cover the finer details of my sonar controller and the associated communication protocol.
After we sort these details out and get the system working like we want, we can get to programming higher level behaviors. For example, I’m currently working on a wall-following program. I’m hoping it will be ready to present in a couple of weeks! Lots of good stuff to come, stay tuned!
Top of page


 and covariance matrix
  need to contain entries for the robot’s pose as well as the landmark locations. The big difference here is that we don’t know how many landmarks we’ll be tracking. This means we need to add new landmarks to the state as we find them.
 , between each landmark and the measurement, and we instead search for the landmark association with the minimum Mahalanobis distance. This is just another way of doing maximum likelihood association. Note also we’re using the same
  matrix as in the
 ![\begin{align*} \text{for all}&\text{ measurements } z_t^i=[r_t^i\ \phi_t^i]^T \text{ do} \\ &\begin{bmatrix} \bar{\mu}_{N_t+1,x} \\ \bar{\mu}_{N_t+1,y} \end{bmatrix} = \begin{bmatrix} \bar{\mu}_{t,x} \\ \bar{\mu}_{t,y} \end{bmatrix} + r_t^i \begin{bmatrix} \cos(\phi_t^i+\bar{\mu}_{t,\theta}) \\ \sin(\phi_t^i+\bar{\mu}_{t,\theta}) \end{bmatrix} \\ \text{for}&\text{ all landmarks } k \text{ to } N_{t+1} \text{ do} \\ &q = (m_{k,x} - \bar{\mu}_{t,x})^2 + (m_{k,y} - \bar{\mu}_{t,y})^2 \\ &r = \sqrt{q} \\ &\hat{z}_t^k = \begin{bmatrix} \sqrt{q} \\ \text{atan2}(m_{k,y}-\bar{\mu}_{t,y},\ m_{k,x}-\bar{\mu}_{t,x})-\bar{\mu}_{t,\theta} \end{bmatrix} \\ &F_{x,k} = \begin{bmatrix} 1&0&0&0&\dots&0&0&\dots&0\\0&1&0&0&\dots&0&0&\dots&0\\0&0&1&0&\dots&0&0&\dots&0\\0&0&0&0&\dots&1&0&\dots&0\\0&0&0&0&\dots&0&1&\dots&0 \end{bmatrix} \\ &h_t^k = \begin{bmatrix} -\delta_{k,x}/r & -\delta_{k,y}/r & 0 & \delta_{k,x}/r & \delta_{k,y}/r \\ \delta_{k,y}/q & -\delta_{k,x}/q & -1 & -\delta_{k,y}/q & \delta_{k,x}/q \end{bmatrix} \\ &H_t^k=h_t^kF_{x,k}\\ &\Psi_k=H_t^k\bar{\Sigma}_t[H_t^k]^T + Q_t \\ &\pi_k=(z_t^i-\hat{z}_t^k)^T\Psi_k^{-1}(z_t^i-\hat{z}_t^k) \\ \text{end}&\text{for} \\ \pi_{N_t+1}&=\alpha \\ j(i) &= \text{argmin}_k\ \pi_k\\ N_t &= \text{max}\{N_t,j(i)\} \\ \text{endfor}& \end{align*}](https://i0.wp.com/andrewjkramer.net/wp-content/ql-cache/quicklatex.com-71b884a246c54720097fd6983f7a37dc_l3.png?resize=414%2C591&ssl=1 "Rendered by QuickLaTeX.com")
 . We finally associate the measurement to the landmark with the lowest distance. If no landmark has a distance lower than
  . Now when doing SLAM the state vector has dimension
  where
where  is the number of landmarks in our problem. In this formulation the coordinates of landmark
  (
( and
and  ) are found at indices
  and
and  of the state vector.
 to
to  where
where  .
.  matrix where the rightmost block is a

 is the motion update calculated from the control input at timestep
  (not the raw control input),
  is the motion Jacobian evaluated at timestep
  is a
is a  is the constant process noise covariance.
 matrix. This time it will be
  , with the subscript
  signifying that it relates the pose
  to landmark
  matrix. The
  identity block occupying the lower two rows and starting at the index
  where
where 

 is the measurement Jacobian. With only these augmentations we can change the localization algorithm with known correspondence to a SLAM algorithm with known correspondence. Not too complicated, right?
![z_t^i = [r_t^i\ \phi_t^i\ s_t^i]^T](https://i0.wp.com/andrewjkramer.net/wp-content/ql-cache/quicklatex.com-2748ddc649f7f00566bd0e4f698c3cd3_l3.png?resize=114%2C20&ssl=1 "Rendered by QuickLaTeX.com") where
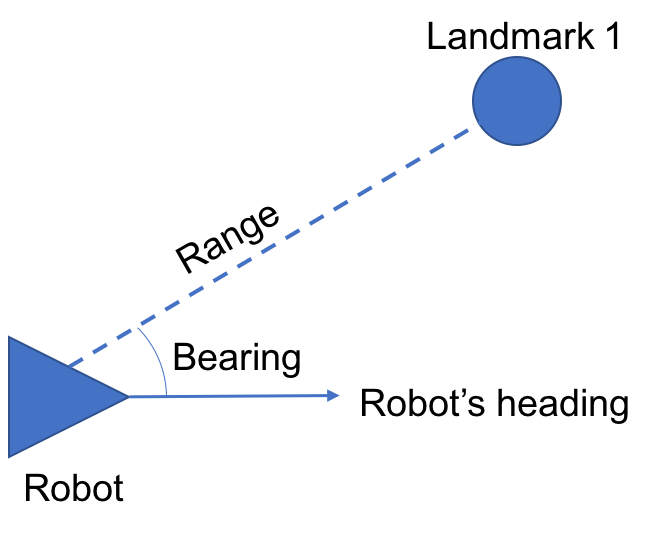
where  is the measurement to landmark
  at time
  . This vector contains the range
  , bearing
  , and, crucially, identity of the landmark being measured
  . This could be interpreted as “landmark
  is
is  meters away, at a bearing of
  radians.”
![z_t^i=[r_t^i\ \phi_t^i]^T](https://i0.wp.com/andrewjkramer.net/wp-content/ql-cache/quicklatex.com-5c2c2413b6a0bc6a72e04a501e2ac888_l3.png?resize=94%2C20&ssl=1 "Rendered by QuickLaTeX.com") . So we are no longer directly telling the robot to which landmark each measurement corresponds. Without knowledge of this correspondence measurements are basically useless to our robot. Sure, it knows the location of a landmark relative to its own location. But without knowing where that landmark is in the world it can’t use that information to refine its estimate of its pose.
. So we are no longer directly telling the robot to which landmark each measurement corresponds. Without knowledge of this correspondence measurements are basically useless to our robot. Sure, it knows the location of a landmark relative to its own location. But without knowing where that landmark is in the world it can’t use that information to refine its estimate of its pose.
 , map
, map  , past measurements
  , and past control inputs
  , which landmark has the highest probability of producing measurement
  ?
?![\begin{align*} \text{for all}&\text{ measurements } z_t^i=[r_t^i\ \phi_t^i]^T \text{ do} \\ \text{for}&\text{ all landmarks } k \text{ in the map } m \text{ do} \\ &q = (m_{k,x} - \bar{\mu}_{t,x})^2 + (m_{k,y} - \bar{\mu}_{t,y})^2 \\ &\hat{z}_t^k = \begin{bmatrix} \sqrt{q} \\ \text{atan2}(m_{k,y}-\bar{\mu}_{t,y},\ m_{k,x}-\bar{\mu}_{t,x})-\bar{\mu}_{t,\theta} \end{bmatrix} \\ &H_t^k = \begin{bmatrix} -\frac{m_{k,x}-\bar{\mu}_{t,x}}{\sqrt{q}} & -\frac{m_{k,y}-\bar{\mu}_{t,y}}{\sqrt{q}} & 0 \\ \frac{m_{k,y}-\bar{\mu}_{t,y}}{q} & -\frac{m_{k,x}-\bar{\mu}_{t,x}}{q} & -1\end{bmatrix} \\ &S_t^k = H_t^k \bar{\Sigma}_t [H_t^k]^T + Q_t \\ \text{end}&\text{for} \\ j(i) &= \text{argmax}_k\ \text{det}(2\pi S_t^k)^{-\frac{1}{2}} \text{exp}\{-\frac{1}{2}(z_t^i-\hat{z}_t^k)[S_t^k]^{-1}(z_t^i-\hat{z}_t^k)^T\}\\ \text{endfor}& \end{align*}](https://i0.wp.com/andrewjkramer.net/wp-content/ql-cache/quicklatex.com-64e1846930d8c3fb71680afa0184f6e8_l3.png?resize=509%2C311&ssl=1 "Rendered by QuickLaTeX.com")
 is the estimated correspondence
  and covariance of
  . The robot’s expected (or most likely) pose is at
  . Then it corrects for noise in the motion update using the robot’s sensor readings
  in order to estimate the state at time
  to time
  . This means it requires less memory and processor time to compute!
 is the robot’s previous x position in meters
 is the robot’s previous y position in meters
 is the robot’s previous heading in radians

 is the robot’s linear velocity in meters/sec
 is the robot’s angular velocity in radians/sec
 where
where  where
where
 is the correspondence between the measurement and landmarks
 where
where  where
where
 is the x position of landmark
  is the y position of landmark
  is the ID of landmark
  , which is the likelihood of the measurements


 , which calculates a new pose based on the previous pose
 is small.
 . In order to do this we need to multiply the covariance from the last timestep,
 . We also need to calculate the additional noise (or uncertainty) associated with the motion that occurred between
 through
  are noise parameters that, unfortunately, need to be hand-tuned for the particular robot being used. Also,
  is in control space and we need to map it into state space. To do this we need the Jacobian of the motion model with respect to the motion parameters
 . To get the complete updated covariance
 and it is calculated using the measurement model
  .
.

 ,
,  , and
, and  are the x position, y position, and ID of landmark
 is a constant for all measurements. It is a
  diagonal matrix with noise parameters
  ,
,  , and
, and  . The sigmas represent the noise for landmark range, bearing, and noise, respectively. Like the alphas in equation (3), the sigmas must be hand-tuned in order to obtain good performance.
 is then used to calculate the Kalman gain,
  . The Kalman gain determines how heavily the sensor information should be weighted when correcting the estimated new pose


 (calculated in equation (7) and the actual measurement
  and
and  . The measurement probability is also calculated here but we are not making use of this value.


